Building Microservices with Spring Boot ,Microservices architecture has gained significant traction in the world of software development for its ability to create scalable, flexible, and resilient systems. “Building Microservices with Spring Boot” is a powerful approach to developing enterprise-level applications by breaking them down into smaller, manageable services. In this guide, we will cover everything you need to know about mastering microservices with Spring Boot—from the basics to more advanced topics.
What is Microservices Architecture?
Page Contents
- 1 What is Microservices Architecture?
- 2 Why Spring Boot for Building Microservices?
- 3 Step 1: Setting Up Your Environment for Building Microservices with Spring Boot
- 4 Step 2: Building Microservices with Spring Boot – Project Structure
- 5 Step 3: Creating Your First Microservice with Spring Boot
- 6 Step 4: Service Discovery with Eureka
- 7 Step 5: API Gateway with Spring Cloud Gateway
- 8 Step 6: Circuit Breaker Pattern with Resilience4j
- 9 Step 7: Monitoring with Spring Boot Actuator
- 10 Summary: Building Microservices with Spring Boot
- 11 Author
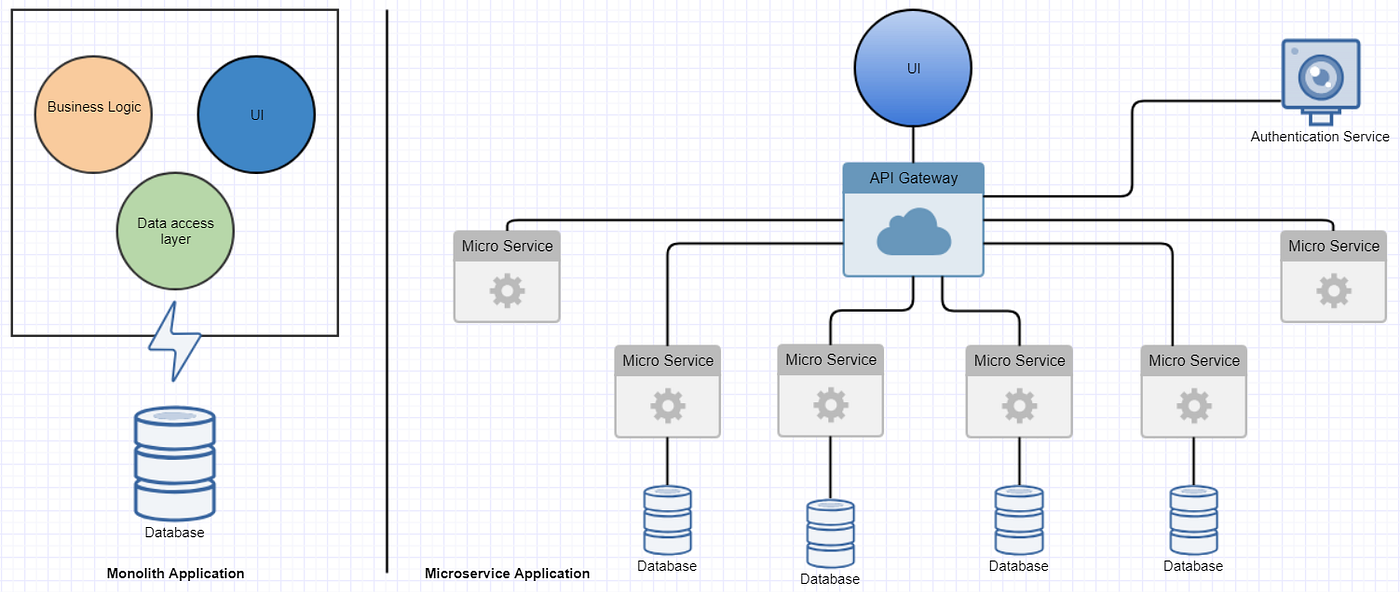
Before diving into “Building Microservices with Spring Boot,” it is essential to understand what microservices architecture is. Microservices represent a software development style that structures an application as a collection of loosely coupled, independently deployable services. Each service represents a specific business capability and can be developed, deployed, and scaled independently of others.
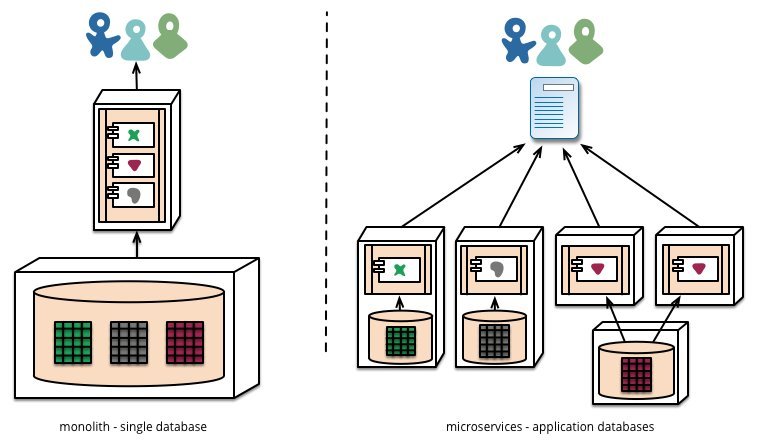
The microservices approach contrasts with monolithic architecture, where the entire application is tightly integrated into a single package. By using microservices, we gain flexibility, resilience, and scalability. Each microservice can communicate with others through well-defined APIs, making it easier to manage, maintain, and scale.
Why Spring Boot for Building Microservices?
“Building Microservices with Spring Boot” is a popular choice due to the power and simplicity that Spring Boot offers. Spring Boot simplifies the development process with features like auto-configuration, embedded servers, and starter templates, all of which help developers quickly build and deploy microservices.
Spring Boot is also backed by the Spring Cloud ecosystem, which provides numerous tools and libraries for managing microservices, such as service discovery, load balancing, API gateways, and circuit breakers. This makes Spring Boot an excellent framework for creating and managing microservices in enterprise applications.
Step 1: Setting Up Your Environment for Building Microservices with Spring Boot
To start “Building Microservices with Spring Boot,” you need to set up your development environment. Here’s what you’ll need:
Install Java Development Kit (JDK)
Spring Boot requires Java to work, so the first step is installing the Java Development Kit (JDK). Make sure you have Java 8 or later installed. To verify your installation, run:
java -versionSet Up an IDE
For “Building Microservices with Spring Boot,” you need a good IDE to write and manage your code. The most popular options are:
- IntelliJ IDEA
- Eclipse
- Spring Tool Suite (STS)
All of these IDEs have integrated support for Spring Boot, making the development process smoother.
Use Spring Initializr to Create Your First Microservice
Visit https://start.spring.io/ to create your Spring Boot project. Fill out the necessary fields and select dependencies such as Spring Web and Spring Boot DevTools. Spring Initializr will generate a project, which you can download and open in your IDE.
Step 2: Building Microservices with Spring Boot – Project Structure
When “Building Microservices with Spring Boot,” it is important to understand the basic structure of a Spring Boot microservice. Each microservice project typically contains the following layers:
- Controller Layer: Handles incoming HTTP requests.
- Service Layer: Implements the business logic.
- Repository Layer: Handles interactions with the database.
A microservice should ideally have its own dedicated database, providing data independence and flexibility.
Step 3: Creating Your First Microservice with Spring Boot
The first step in “Building Microservices with Spring Boot” is creating your microservice. Let’s create a simple microservice called CustomerService that handles customer information.
Create a REST Controller
The CustomerController class handles HTTP requests related to customers:
package com.example.customerservice.controller;

import org.springframework.web.bind.annotation.GetMapping;
import org.springframework.web.bind.annotation.RequestMapping;
import org.springframework.web.bind.annotation.RestController;
import com.example.customerservice.model.Customer;
import java.util.List;
import java.util.Arrays;

@RestController
@RequestMapping("/api/customers")
public class CustomerController {

    @GetMapping
    public List<Customer> getAllCustomers() {
        return Arrays.asList(
                new Customer(1, "John Doe"),
                new Customer(2, "Jane Doe"),
                new Customer(3, "Alice Smith")
        );
    }
}
This REST controller defines a /api/customers endpoint that returns a list of customers when accessed via HTTP GET.
Create a Customer Model
The Customer model represents a customer object in your microservice:
package com.example.customerservice.model;

public class Customer {
    private int id;
    private String name;

    // Constructor
    public Customer(int id, String name) {
        this.id = id;
        this.name = name;
    }

    // Getters and setters
    public int getId() {
        return id;
    }

    public void setId(int id) {
        this.id = id;
    }

    public String getName() {
        return name;
    }

    public void setName(String name) {
        this.name = name;
    }
}
Step 4: Service Discovery with Eureka
When “Building Microservices with Spring Boot,” it is important to ensure that microservices can locate each other. Eureka is a service registry from Netflix that helps microservices discover each other dynamically.
To set up Eureka, create a new project called DiscoveryService using Spring Initializr and include Eureka Server as a dependency. Add the @EnableEurekaServer annotation to the main class:
package com.example.discoveryservice;

import org.springframework.boot.SpringApplication;
import org.springframework.boot.autoconfigure.SpringBootApplication;
import org.springframework.cloud.netflix.eureka.server.EnableEurekaServer;

@SpringBootApplication
@EnableEurekaServer
public class DiscoveryServiceApplication {
    public static void main(String[] args) {
        SpringApplication.run(DiscoveryServiceApplication.class, args);
    }
}
To register CustomerService with Eureka, add the following dependencies to its pom.xml:
<dependency>
    <groupId>org.springframework.cloud</groupId>
    <artifactId>spring-cloud-starter-netflix-eureka-client</artifactId>
</dependency>
In application.properties, add:
spring.application.name=customer-service
eureka.client.service-url.defaultZone=http://localhost:8761/eureka/
This configuration will register CustomerService with Eureka running on port 8761.
Step 5: API Gateway with Spring Cloud Gateway
When “Building Microservices with Spring Boot,” an API Gateway acts as a single entry point for all your microservices. Spring Cloud Gateway is a powerful tool that handles routing, monitoring, and security for your microservices.
Create a new Spring Boot project called APIGateway and add the following dependency:
<dependency>
    <groupId>org.springframework.cloud</groupId>
    <artifactId>spring-cloud-starter-gateway</artifactId>
</dependency>
Add routing configuration in application.properties:
spring.application.name=api-gateway
eureka.client.service-url.defaultZone=http://localhost:8761/eureka/

spring.cloud.gateway.routes[0].id=customer-service
spring.cloud.gateway.routes[0].uri=lb://customer-service
spring.cloud.gateway.routes[0].predicates[0]=Path=/api/customers/**
This configuration will allow requests to /api/customers/** to be routed to the CustomerService through Eureka using load balancing (lb:// syntax).
Step 6: Circuit Breaker Pattern with Resilience4j
When “Building Microservices with Spring Boot,” resilience is a crucial aspect. Resilience4j provides circuit breaker functionality to ensure that if a microservice is down, your system remains stable and responsive.
Add the following dependency to CustomerService:
<dependency>
    <groupId>io.github.resilience4j</groupId>
    <artifactId>resilience4j-spring-boot2</artifactId>
</dependency>
Add a simple circuit breaker using annotations:
import io.github.resilience4j.circuitbreaker.annotation.CircuitBreaker;

@GetMapping
@CircuitBreaker(name = "customerService", fallbackMethod = "getDefaultCustomers")
public List<Customer> getAllCustomers() {
    // Simulate some service logic
    return Arrays.asList(
            new Customer(1, "John Doe"),
            new Customer(2, "Jane Doe"),
            new Customer(3, "Alice Smith")
    );
}

public List<Customer> getDefaultCustomers(Throwable throwable) {
    return Arrays.asList(new Customer(0, "Default Customer"));
}
With this setup, if getAllCustomers() fails, getDefaultCustomers() will be called as a fallback.
Step 7: Monitoring with Spring Boot Actuator
For monitoring microservices while “Building Microservices with Spring Boot,” Spring Boot Actuator provides production-ready endpoints that give insights into the application.
Add the dependency to CustomerService:
<dependency>
    <groupId>org.springframework.boot</groupId>
    <artifactId>spring-boot-starter-actuator</artifactId>
</dependency>
Actuator exposes useful metrics such as /actuator/health and /actuator/metrics, which can be used to monitor the health of your microservices.
Summary: Building Microservices with Spring Boot
In this step-by-step guide, we’ve covered all the key aspects of “Building Microservices with Spring Boot.” We started with setting up a basic microservice and gradually moved on to more advanced features like service discovery with Eureka, API Gateway with Spring Cloud Gateway, and resilience using Resilience4j. We also learned how to monitor microservices using Spring Boot Actuator.
Spring Boot, combined with Spring Cloud, is a powerful toolset for building and managing microservices, providing watitoto developers with everything they need to build scalable, resilient, and flexible applications. By breaking down applications into smaller, independent microservices, you can achieve greater agility, ease of deployment, and simplified scalability.
The journey of mastering microservices with Spring Boot involves understanding how to develop each microservice independently, how to manage their communication, and how to ensure the entire system remains resilient. Start small, experiment, and gradually add more microservices to your ecosystem to experience the full power of this architecture. Happy coding!